Liferay GWT portlet - how to make it "instanceable" and use GWT RPC
Every once in a while somebody asks about writing Liferay portlets in GWT. It seems a lot of people are successfully using GWT with Liferay but surprisingly I couldn't find any complete tutorial on the subject. There are a of course tutorials explaining the basics but what they concentrate on, is how to build single-instance and client-side-only portlets. This is good enough to get you started but chances are sooner or later you'll need to place two instances of the same GWT portlet on the same page and/or implement GWT RPC to make use of the Liferay services.
I've reached that point myself sometime ago and unfortunately had to solve the problem myself. Then I wrote sample portlet called gwt-chatrooms-portlet to demonstrate the solution and hopefully save you some time. So here is a step by step tutorial how to create GWT portlet for Liferay 6.0.5 which:
- allows many instances to be placed on the same page
- uses GWT RPC for client-server communication
The gwt-chatrooms-portlet is very simple portlet allowing users to enter chat room (by typing in it's name) and then chat with other users. Here is screenshot :
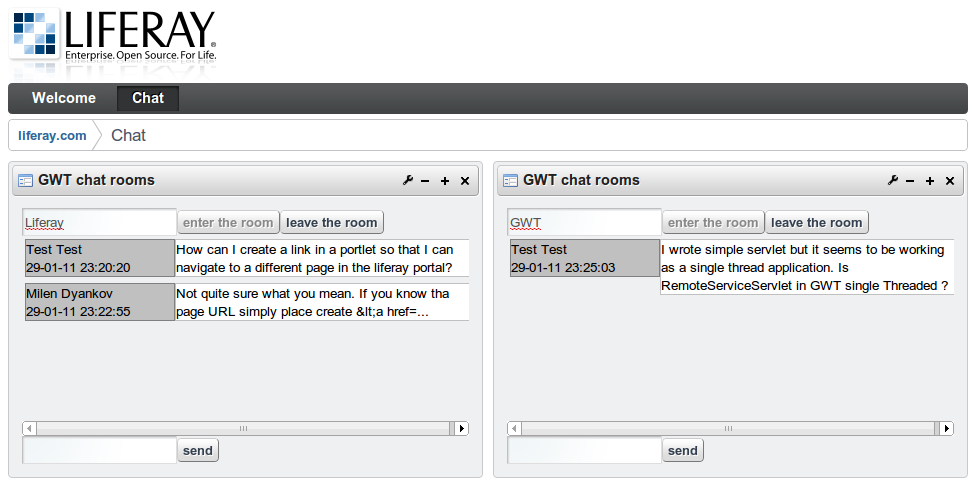
As you can see, multiple instances can be added on the same page allowing users to chat in more than one room at a time. Message persistence API is generated using Liferay's ServiceBuilder. The GWT client code uses GWT RPC to receive room messages from the server and store new ones. Here is how to build it.
Generate the portlet in Liferay SDK
OK first things first. Make sure you have Liferay 6.0.5 and Liferay plugins SDK-6.0.5 installed and configured. Then create new portlet by tying :
create.sh gwt-chatrooms "Chatrooms - Sample GWT portlet"
in <LIFERAY_SDK_HOME>/portlets. This will create gwt-chatrooms-portlet folder and the standard set of files. This is in my first commit.
Add GWT compile task to the build
Before you continue with actual development, you have to add an ant task to <LIFERAY_SDK_HOME>/portlets/gwt-chatrooms-portlet/build.xml responsible for compiling GWT code. The code is available here. You have probably noticed my task uses ${gwt.sdk} variable. To use it as is you have to set it's value in <LIFERAY_SDK_HOME>/build.<USER_NAME>.properties file :
gwt.sdk=<GWT_HOME>
Create GWT module and entry point class
Now you are ready for GWT portlet development. Create GWT module file gwt-chatrooms-portlet/docroot/WEB-INF/src/com/commsen/sample/portlet/chatrooms/Chatrooms.gwt.xml
<module rename-to='Chatrooms'>
  <inherits name='com.google.gwt.user.User'/>
  <inherits name='com.google.gwt.user.theme.standard.Standard'/>
  <entry-point class='com.commsen.sample.portlet.chatrooms.client.GWTEntryPoint'/>
  <source path='client'/>
  <source path='shared'/>
</module>
and GWT entry point class <LIFERAY_SDK_HOME>/portlets/gwt-chatrooms-portlet/docroot/WEB-INF/src/com/commsen/sample/portlet/chatrooms/client/GWTEntryPoint.java
public class GWTEntryPoint implements EntryPoint {
   @Override
   public void onModuleLoad() {
      RootPanel.get("chatrooms-portlet").add(new HTML("This is the <b>GWT chat rooms</b> portlet."));
   }
}
In view.jsp remove the default message and add div element with id "chatrooms-portlet" - this is the container for GWT code. Next replace default value of "footer-portlet-javascript" in <LIFERAY_SDK_HOME>/portlets/gwt-chatrooms-portletdocroot/WEB-INF/liferay-portlet.xml with "/Chatrooms/Chatrooms.nocache.js" (assuming "Chatrooms" is the name of your GWT module). Here are my changes.
Before you deploy and see your portlet in action you need to also add
<ajaxable>false</ajaxable>
into portlet's configuration in liferay-portlet.xml file to make sure Liferay will not use AJAX to load portlet's content . However if you try to place 2 instance of the portlet on the same page you'll be surprised that one of them (or even both in some browsers) shows up empty. This is because the HTML page now has more than one div element with the same id "chatrooms-portlet".
Make GWT code recognize portlet instances
To overcome the problem you can make use of portlet's instance id and add it to the id of the div element in every portlet. To prepare for this change, create a javascript array (say chatroomPortletInstances) to hold portlet instance ids. Here is how I did it. Then modify view.jsp so that it adds the portlet id into chatroomPortletInstances and make the div id contain the portlet id. See my code for example.
Now you need to let the GWT code "know" about portlet instances. So instead of doing all initialization in the entry point class (which I consider bad practice anyway) create a dedicated class (say Chatroom) with constructor accepting portlet id as parameter. This way you can create dedicated Chatroom instance for every portlet instance. In order to do that you need to know the ids of all portlet instances available on the page and this is where chatroomPortletInstances array comes in. Thanks to GWT's JSNI is as easy as
     public static native JsArrayString getPortletInstances()
     /*-{
         return $wnd.chatroomPortletInstances;
     }-*/;
Now all that's left is to iterate over portlet instances and create Chatroom instance for each. Of course feel free to use my code as example.
Now you can place as many GWT portlet instances as you wish on the same portal page!
If you want to test it, go to portlet's folder ant type
ant clean gwtc deploy
Generate Liferay services with ServiceBuilder
The portlet needs to persist the chatrooms' messages in Liferay's database. Thus you need to have at least some services and persitence API on the server side. Fortunately with Liferay's ServiceBuilder almost everything can be generated by providing a single XML file. Here is the one I used. I'm not going to explain in details how ServiceBuilder works (please see Liferay's documentation). In case you are not really trying to learn but simply follow the instructions, here is the one-liner: Place the XML file in WEB-INF folder and then doant build-serviceit will generate everything you need.
The most important things to notice are the Message interface (represents chatroom message) and the MessageLocalServiceUtil class which provides convenient static methods for creating, storing and retrieving Message objects. By the way this commit contains all the files generated by ServiceBuilder in case you are curious.
Implement the view and GWT RPC
Finally it is time to get your hands dirty with some real GWT stuff. First you need to create standard GWT RPC service to save and receive messages. So create the ChatroomService and ChatroomServiceAsync interfaces in client code and ChatroomServiceImpl in server side code. They need to have 2 methods saveMessage and getMessages.
In the implementation code of those methods in ChatroomServiceImpl you can call appropriate methods form MessageLocalServiceUtil or use Liferay's utility class PortalUtil to get access to other Liferay services (for example to get the current user). Here is what I did.
Then you need to code the view. It's really up to you how you design the front end but of course I'll use my version of Chatroom class to point out the key elements:
- sendMessageToServer method uses ChatroomService to send user's message
- getMessages method is continuously called by GWT timer to refresh the chatroom view
- somewhat mysterious code at line 52
By now you may think that you are ready. Simply configure ChatroomServiceImpl servlet in web.xml, compile, deploy and enjoy. In fact if you do so, there will be unpleasant surprise. The problem with this standard GWT approach is that you will be calling the ChatroomServiceImpl servlet directly and not through the portal. This means the portal will never have a chance to do it's magic. This means non of it's service classes will be available for the servlet. This means you'll see a nice NoClassDefFoundError in your server's logs.
Luckily since version 4.3.x Liferay has built in solution for this problem. It's called PortalDelegateServlet. I'm oversimplifying the concept here but basically it allows you to define a servlet in portal's context. There is special delegate servlet, mapped at /delegate location. Liferay extensions can configure sub-contexts to redirect to their own servlets after the portal is done with the magic. Having this in mind there are 2 more things you need to do:
- configure your portlet to use PortalDelegateServlet
- change the address of your servlet in GWT's front-end code
For the first one have a look at how I have done it and for the second one ... well that is the "somewhat mysterious code at line 52" mentioned above. Of course complete list of changes described in this section is in my final commit.
And this is it. Compile, deploy, enjoy!